Adding products to WooCommerce is straightforward once you understand the structure — but WooCommerce offers far more product types and configuration options than most store owners realise. Getting this right from the start means better SEO, cleaner inventory management, and fewer problems as your catalogue grows.
This guide walks through every product type and every key setting, from a simple physical product to variable products with multiple attributes. For the full setup guide see our article on WooCommerce variable products, digital downloads, and grouped items.

How to add products to WooCommerce
WooCommerce Product Types: Which One Do You Need?
Before adding a product, you need to know which product type applies. WooCommerce has six built-in product types:
| Product Type | Use Case |
|---|---|
| Simple product | A single item with no variations — one price, one SKU |
| Variable product | A product with options (size, colour) — each combination has its own price/SKU |
| Grouped product | A collection of related simple products displayed together |
| External / Affiliate product | A product listed on your site but purchased elsewhere |
| Virtual product | A service or non-physical item — no shipping required |
| Downloadable product | A digital file (PDF, software, audio) delivered via download link after purchase |
The most common types for physical stores are Simple and Variable. Digital product stores typically use Downloadable. Service businesses use Virtual.
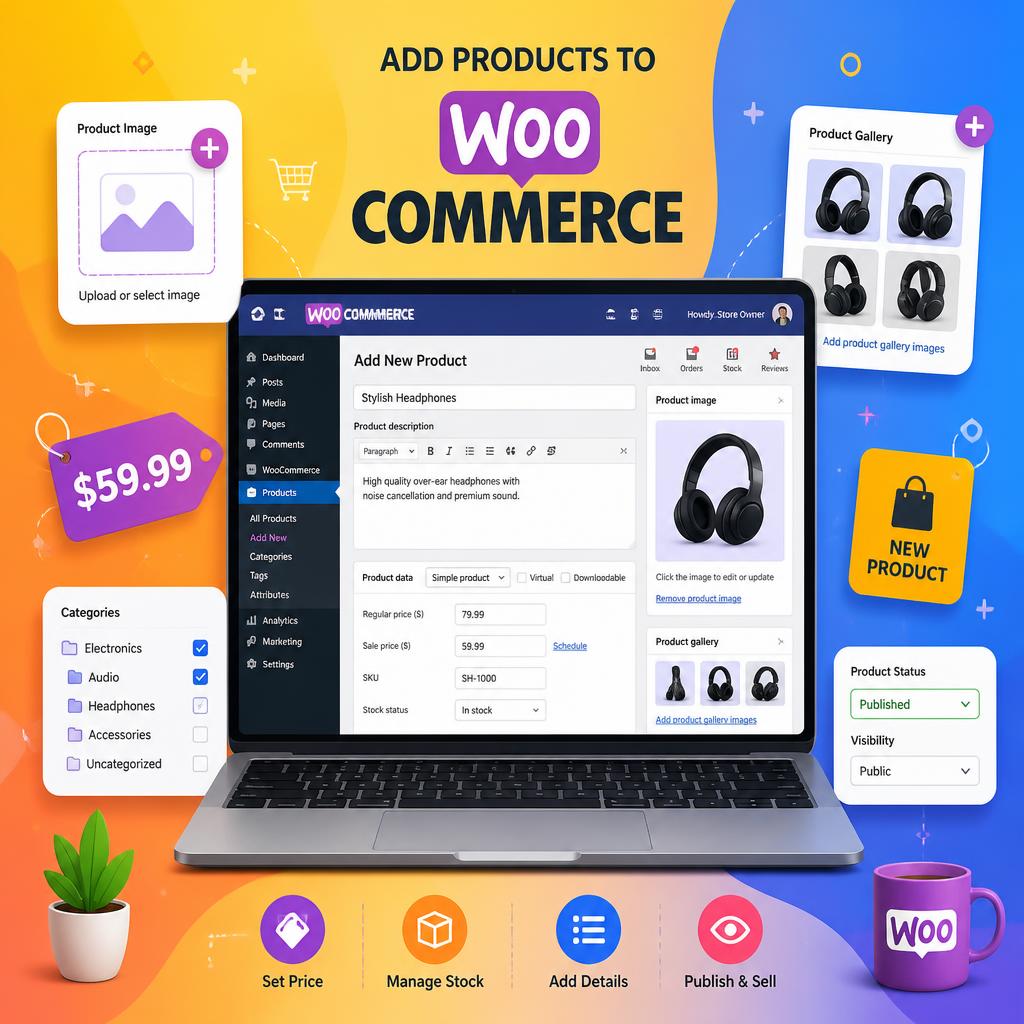
How to Add a Simple Product in WooCommerce
A simple product is the most straightforward — one product, one price, no variations.
- Go to Products → Add New in your WordPress dashboard
- Enter your product title in the top field — this becomes your H1 and is the most SEO-important element on the page
- Add your long description in the main content editor below — this is the full product description that appears in the Description tab on the frontend
- In the Product Data panel, select Simple product from the dropdown
- Enter the Regular price and, if applicable, a Sale price
- Add the Short description in the panel below the main editor — this appears near the Add to Cart button
- Set the Product image in the right sidebar — this is your main product photo
- Add any additional photos to the Product gallery
- Assign Categories and Tags in the right sidebar
- Click Publish
That’s the minimum viable product. The sections below cover the additional settings that separate a well-configured product from a basic one.
Product Data: The Key Settings
The Product Data panel is where most of WooCommerce’s configuration lives. It has several tabs:
General Tab
Sets the price (regular and sale), tax status, and tax class. For UK stores, set the tax class to Standard for VAT-applicable products. The sale price can be scheduled with start and end dates — useful for time-limited promotions.
Inventory Tab
Manage stock here. Key settings:
- SKU — your internal stock keeping unit. Use a consistent format from the start; changing SKUs later causes problems with order history and integrations
- Manage stock — enable this to track inventory levels and automatically mark products as out of stock
- Stock quantity — current inventory count
- Allow backorders — whether customers can order when stock hits zero
- Low stock threshold — triggers a notification email when stock falls to this level. Recommendation: Set this to 3–5 units to trigger notifications early enough to account for supplier lead times.
- Sold individually — limits purchase to one per order (useful for unique or high-value items)
Shipping Tab
Enter the physical dimensions and weight of the product. This data is used by real-time shipping rate plugins (Royal Mail, DPD, etc.) to calculate accurate shipping costs at checkout. Leaving these blank means flat-rate or manual shipping rules apply instead.
Linked Products Tab
Two options here that matter for both revenue and SEO:
- Up-sells — products shown on the product page as alternatives or upgrades (“You might also like…”)
- Cross-sells — products shown in the cart as complementary items (“Customers also bought…”)
Filling these in manually is time-consuming for large catalogues. Plugins like WooCommerce Product Recommendations automate this based on purchase history.
Attributes Tab
Used to define product characteristics like colour, material, or size. Attributes added here can be displayed in the product’s Additional Information tab on the frontend. For variable products, attributes are what create the dropdown selectors customers use to choose their variant.
Advanced Tab
Controls purchase notes (a message sent to the customer after purchase), menu order (for controlling display position), and whether reviews are enabled on this product. Enable reviews — they contribute to product schema ratings and improve conversion rate.

WooCommerce product data settings panel
How to Add a Variable Product in WooCommerce
Variable products are for items that come in multiple options — a T-shirt in different sizes and colours, for example. Each combination of attributes (Small/Red, Medium/Blue) is a variation, and each variation can have its own price, SKU, stock level, and image.
- Go to Products → Add New
- Enter the product title and descriptions as normal
- In the Product Data panel, select Variable product from the dropdown — the panel tabs will change
- Go to the Attributes tab
- Click Add and either select a global attribute (like PA_Size or PA_Colour that you’ve defined under Products → Attributes) or create a custom attribute for this product only
- Enter the attribute values (e.g. Small | Medium | Large), check Used for variations, and click Save attributes
- Repeat for any additional attributes (e.g. Colour)
- Go to the Variations tab
- Select Create variations from all attributes from the dropdown and click Go — WooCommerce generates every possible combination
- Expand each variation to set its price, SKU, stock, and optionally a variation-specific image
- Click Save changes and then Publish
A few things to know about variable products:
- You must set a price on at least one variation, or the product won’t display a price on the frontend
- Variation images replace the main product image when that variation is selected — upload separate images per variation for best UX
- Stock can be managed at variation level rather than product level — more accurate for inventory tracking
- WooCommerce limits variation display to 30 per page by default; stores with large attribute matrices may need to adjust this or use a variation swatches plugin
How to Add a Downloadable Product in WooCommerce
For digital products — PDFs, software, audio files, e-books — the process is similar to a simple product with a few additions:
- In the Product Data panel, check Virtual and Downloadable — this removes the Shipping tab and adds a Downloads section
- Under Downloadable files, click Add file and upload your file or enter a URL
- Set a Download limit (how many times the customer can download) and Download expiry (days after purchase the link remains active) — both optional but recommended for protecting paid content
- Set the price and publish
Customers receive their download link automatically in their order confirmation email and in their account under Downloads.
SEO Settings for WooCommerce Products
With Rank Math Pro or Yoast installed, each product has an SEO panel below the main editor. Configure:
- Focus keyword — the primary search term you’re targeting (e.g. “navy merino wool jumper mens UK”)
- SEO title — defaults to the product title; customise if the product title alone doesn’t make a strong search result headline
- Meta description — write this as a call to action, not just a description. It doesn’t affect ranking but does affect click-through rate. Keep under 155 characters.
- Schema — Rank Math automatically applies Product schema; verify price, availability, and rating are populating correctly
- Product images — compress all product images to under 150KB in WebP format before uploading to ensure optimal LCP scores.
For more on WooCommerce SEO beyond individual products, see our complete WooCommerce SEO guide. For variable products with multiple options, see our WooCommerce variable products guide.
Product Categories and Tags
Assign every product to at least one category. Categories are the primary navigation structure for your store and are important for both UX and SEO — category pages target broader keywords than individual product pages.
A few rules:
- Assign each product to the most specific applicable category — if you have a “Dresses” category and a “Midi Dresses” subcategory, assign to Midi Dresses, not both
- Avoid assigning products to too many categories — it creates duplicate content issues
- Use tags for attributes that cut across categories (e.g. “sale”, “new arrival”, “sustainable”) but don’t rely on tag archives for SEO unless you’re actively optimising them
Bulk Adding Products to WooCommerce
For stores with large catalogues, adding products one by one isn’t practical. WooCommerce has two efficient alternatives:
CSV Import
Go to Products → Import. WooCommerce accepts a CSV file with columns mapped to product fields — title, description, price, SKU, stock, categories, images, and attributes. Download the sample CSV from the import screen to see the required format. This is the fastest way to bulk-load an initial catalogue or migrate from another platform.
WooCommerce REST API
For programmatic product creation — integrating with a supplier feed, PIM system, or ERP — WooCommerce’s REST API allows full CRUD operations on products. This requires developer involvement but is the right approach for any store where product data originates outside WordPress.
Pro Tip: Before you import a large catalogue, spend time designing your category structure and global attributes. Always use Global Attributes (Products → Attributes) instead of custom product-level attributes. Global attributes enable layered navigation filtering (e.g., filtering all ‘Red’ products across categories), which is critical for UX and prevents duplicate content issues. Changing these after hundreds of products are live is painful. A clean attribute system makes the store far easier to manage long-term.
Frequently Asked Questions
How do I add product variations in WooCommerce?
Select Variable product in the Product Data panel, add your attributes under the Attributes tab with “Used for variations” checked, then go to the Variations tab and generate variations from all attributes. Set a price on each variation and save. Full steps are covered in the variable product section above.
Can I add products to WooCommerce without the admin panel?
Yes — via CSV import (Products → Import) for bulk additions, or via the WooCommerce REST API for programmatic creation. The REST API requires authentication via API keys generated under WooCommerce → Settings → Advanced → REST API.
How do I set a sale price in WooCommerce?
In the Product Data panel under the General tab, enter both a Regular price and a Sale price. The sale price can be scheduled — click the “Schedule” link next to the sale price field to set start and end dates for the promotion.
Why isn’t my WooCommerce product showing up in the shop?
Check the product status (must be Published, not Draft), catalogue visibility (under the Publish panel — should be set to Shop and search results), that a price is set (products without prices are hidden by default), and that stock status is In stock if stock management is enabled.
How do I manage stock in WooCommerce?
Enable stock management per product under the Inventory tab in the Product Data panel. Set the quantity, configure low stock notifications, and decide whether to allow backorders. Global stock settings (like the low stock email threshold) are under WooCommerce → Settings → Products → Inventory.
Categories are the primary organisational structure — hierarchical, used for navigation, and important for SEO. Tags are flat descriptors that cut across categories. Use categories for your main product taxonomy and tags for secondary attributes like “new in”, “sale”, or “sustainable”. Don’t over-tag — unused tag archives create thin content issues.

With over two decades of web design and development expertise, I craft bespoke WordPress solutions at FallingBrick, delivering visually striking, high-performing websites optimised for user experience and SEO.