‘Fatal Error Allowed Memory Size Exhausted’ WordPress Memory Size Fix
WordPress Memory Size Fix
The “allowed memory size exhausted” error is a common issue faced by WordPress users, particularly those using shared hosting plans. This error occurs when either the server limits the amount of memory used by the website or a plugin consumes excessive server memory. In this article, we will explore two options to resolve this error and get your website up and running smoothly.

Fatal Error Allowed Memory Size Exhausted WordPress Memory Size Fix
What Causes the “Fatal Error Allowed Memory Size Exhausted” Error?
WordPress relies on PHP code and scripts for its functionality. PHP is a server-side programming language that requires server resources to execute actions and scripts. This means that your WordPress system and the plugins you install can consume server memory. The “allowed memory size exhausted” error occurs when WordPress or one of its plugins consumes too much server memory. This commonly happens with high-traffic or large websites hosted on shared servers that allocate limited PHP memory to each hosting account.
To fix this error, you need to manually increase the default PHP memory limit set for your server.
Understanding PHP Memory Limit
The PHP memory limit refers to the amount of memory allocated by your server for executing PHP code and scripts used by WordPress and its plugins. Different web hosting providers assign different amounts of memory to each hosting plan. For instance, some providers offer 256MB of memory per hosting account, which is sufficient for a WordPress website with regular traffic. Memory exhausted errors typically occur when the web host allocates lower amounts of memory per website.
Option 1: Increase PHP Memory Limit
To increase the PHP memory limit, you need to modify the wp-config.php file on your server. There are two methods to access the WordPress files on your server: using the File Manager in cPanel or an FTP client application. Here, we’ll demonstrate how to do it using the File Manager.
Step 1. Log in to your cPanel by appending /cpanel to your domain name (e.g., yourwebsite.com/cpanel). Use the login credentials provided by your web host.
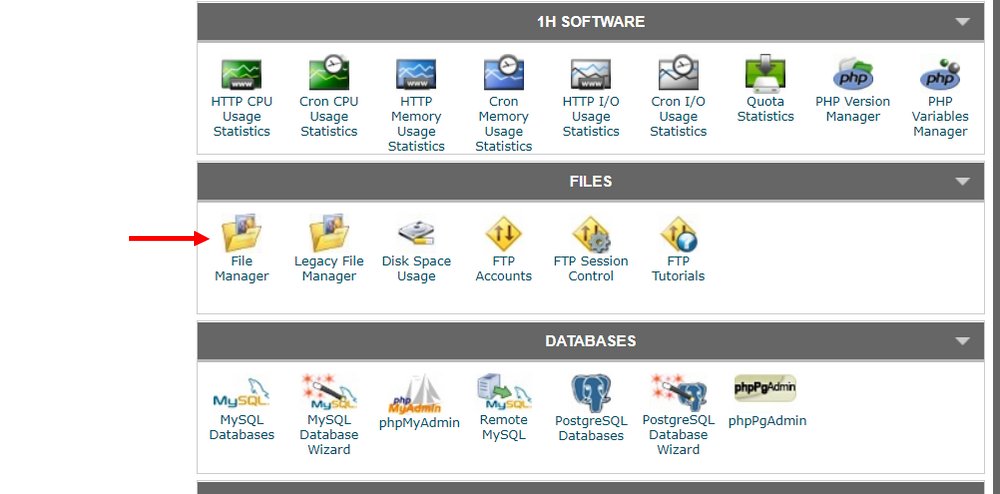
Step 2. Open the File Manager and navigate to the public_html folder.
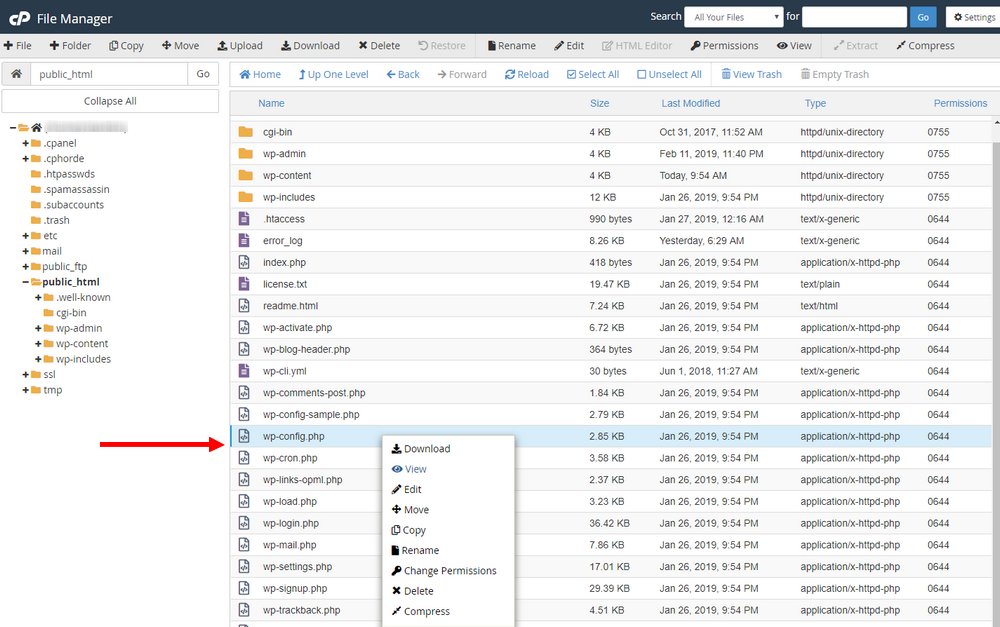
Step 3. Locate the wp-config.php file, right-click on it, and choose Edit.
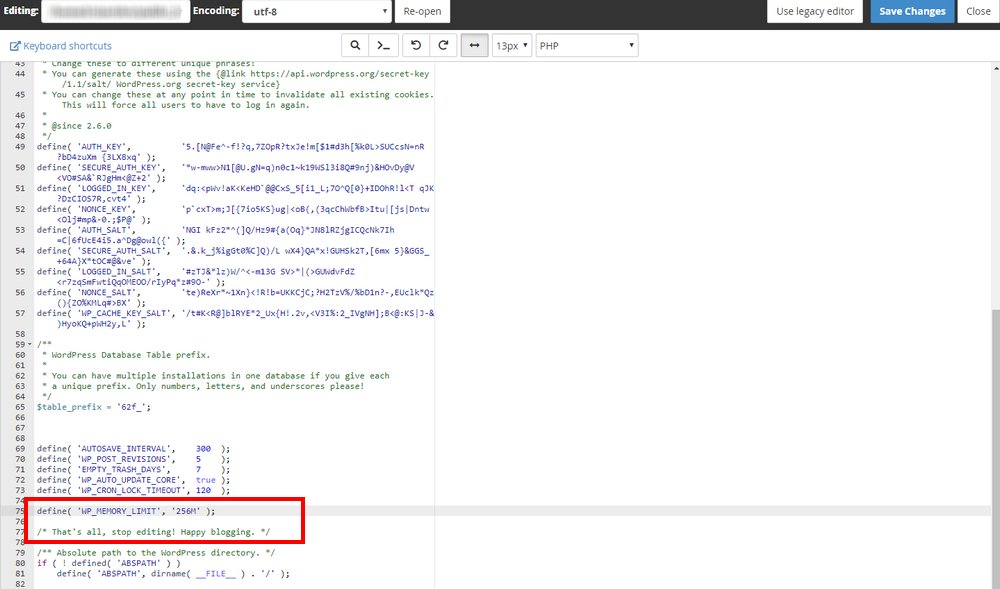
Step 4. Search for the line that says “That’s all, stop editing! Happy blogging” and paste the following code just above it:
define( 'WP_MEMORY_LIMIT', '256M' );This sets your default PHP memory limit to 256MB.
Step 4. Click Save to apply the changes. Reload your website to check if it resolves the error.
Note: Always create a backup copy of files before making any modifications.
Option 2: Disable and Reactivate Plugins
Increasing the PHP memory limit usually fixes the memory exhaustion error. However, if the error persists, it might be caused by a specific plugin. You can identify the problematic plugin by disabling all the plugins and then reactivating them one by one.
Since you can’t access your WordPress dashboard, you need to disable the plugins from the server.
Step 1. Follow the steps from the previous method to log in to your server.
Step 2. Open the wp-content folder and locate the plugin’s directory.
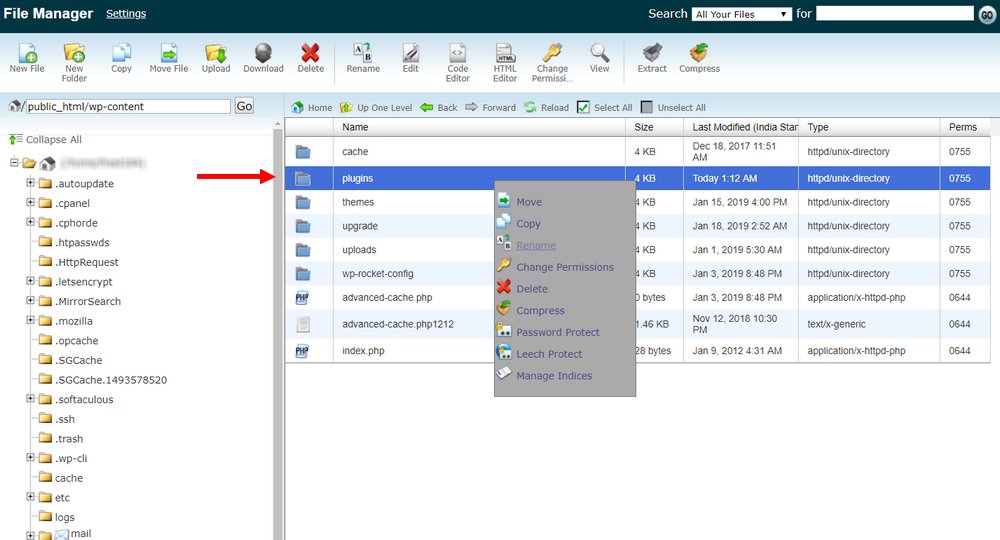
Step 3. Rename the plugins directory to “plugins-bad”. Don’t worry, this won’t delete any installed plugins.
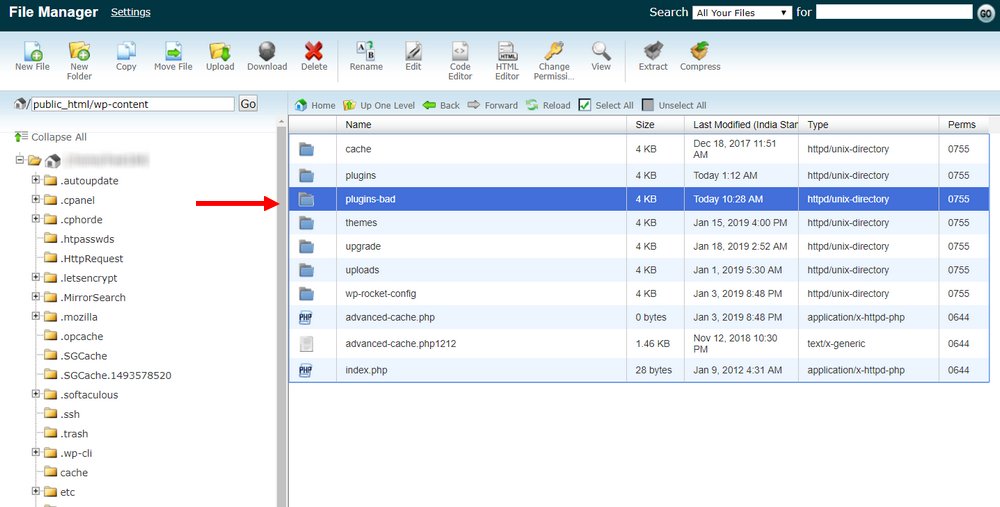
Step 4. Create a new empty directory and name it plugins. This will disable all the plugins on your website. Now, reload your website to check if it resolves the error. If your website functions normally again, it indicates that the error was likely caused by a plugin. Return to the wp-content directory. **
Step 5. Delete the empty directory you created earlier and rename the “plugins-bad” directory back to “plugins”. This will restore your previous set of plugins without activating them.
Step 6. Now, you can log in to your WordPress dashboard and reactivate the plugins one by one to determine which one is causing the error.
If the Problem Persists
If you continue to encounter the same issue even after trying the above solutions, it may indicate a server-related problem, and it is advisable to seek professional assistance. Contact your web host’s technical support team and explain the situation. They can provide further guidance or help you upgrade your hosting plan to a larger one if necessary.
In conclusion, the “allowed memory size exhausted” error in WordPress can be resolved by increasing the PHP memory limit or disabling problematic plugins. By following the steps outlined in this article, you can effectively troubleshoot and fix this common error, ensuring the smooth operation of your WordPress website.
FAQ
What does the “Allowed memory size exhausted” error mean in WordPress?
The “allowed memory size exhausted” error occurs when either your server limits the amount of memory allocated to your website or a plugin consumes excessive server memory. This error message indicates that your website has surpassed the allocated memory limit, causing the error to occur.
How can I fix the “Allowed memory size exhausted” error in WordPress?
There are a few solutions you can try:
- Increase the PHP memory limit by modifying the
wp-config.phpfile on your server. - Disable all plugins and reactivate them one by one to identify the problematic plugin.
- Contact your web host’s technical support for further assistance.
Can I fix the “Allowed memory size exhausted” error without accessing my WordPress dashboard?
Yes, you can fix this error without accessing your WordPress dashboard. You can modify the wp-config.php file and disable plugins directly from your server using cPanel or an FTP client.
How do I increase the PHP memory limit in WordPress?
To increase the PHP memory limit, follow these steps:
- Log in to your cPanel or access your server using an FTP client.
- Locate the
wp-config.phpfile in the root directory of your WordPress installation. - Add the following code just above the line that says “
That’s all, stop editing! Happy blogging“:define( 'WP_MEMORY_LIMIT', '256M' );This sets the PHP memory limit to 256MB.
- Save the changes and reload your website to check if the error is resolved.
How do I disable plugins to troubleshoot the “Allowed memory size exhausted” error?
To disable plugins without accessing your WordPress dashboard, follow these steps:
- Log in to your server using cPanel or an FTP client.
- Navigate to the
wp-contentdirectory. - Rename the
pluginsdirectory to something likeplugins-bad. - Create a new, empty
pluginsdirectory. - Reload your website to see if the error is resolved.
- If the error is fixed, you can identify the problematic plugin by reactivating them one by one.
What should I do if the “Allowed memory size exhausted” error persists?
If you’ve tried increasing the PHP memory limit and disabling plugins but the error persists, it may indicate a server-related issue. Contact your web host’s technical support team and explain the problem. They can provide further assistance or recommend upgrading to a hosting plan with a higher memory allocation.
Remember to always create backups of your files before making any modifications, and if you’re unsure or uncomfortable with performing these steps yourself, consider seeking the help of a professional or your web host’s support team.

With over two decades of web design and development expertise, I craft bespoke WordPress solutions at FallingBrick, delivering visually striking, high-performing websites optimised for user experience and SEO.


